INTRO
| START
| PREVIOUS
| NEXT
|
THUMBNAILS
| INDEX
| ARTICLES
| PHOTO ESSAYS
|
Understanding
White Balance
By
TV Smith
13th
March 2004
Staying
balanced may not be good all the time, TV
SMITH explains…
Driving
home one evening, a beautiful and dramatic
sunset appeared before you. You stopped
the car and quickly reached for your
digital camera. Upon framing the shot,
you noticed that the scene rendered
on the camera's LCD screen appeared
less spectacular than the one you witnessed
directly. Somehow, the camera could
not adequately capture the beauty of
the setting sun with its characteristic
orange glow and backdrop of pinkish
clouds. Was there something wrong with
your camera, you wondered to yourself?
There is nothing wrong with the camera.
It was just doing its job as it was
designed and programmed to do. The camera
detected an overly warm scene and corrected
it to make the colours more neutral
or balanced as it defined it. In the
process, the camera reduced the picturesque
sunset into a pale, almost ordinary
scene. |
|

Bright
lighting conditions plus proper white
balancing brings out the colours and
contrast. ISO 50, f8, 1/500 sec
|
Through the use of external
and internal sensors, a typical digital
camera sets the so-called 'White Balance'
electronically by measuring the 'color temperature'
of the light it senses. It usually gets
the colours rendered right but on tricky
or mixed lighting conditions, it can be
fooled. Unlike the human eye and brain,
the camera's sensor and circuitry are unable
to process the information from an aesthetic
point of view.
For
film cameras, the colour balance is handled
by choosing either 'daylight' or 'tungsten'
balanced film. When required, colour compensating
or light balancing optical filters are used
to correct mismatched light and film. When
using colour print films, incorrect colour
balance can be adjusted to a certain extent
during the printing stage. Likewise for
digital picture files, most white balance
mistakes or inaccuracies can be corrected
with image editing software on the computer.
However, you can easily save yourself this
time consuming step as the preview/review
feature on digital cams offers one important
advantage over film cameras; instant correction
and confirmation. But where does one start?
On most digital cameras the white balance
defaults to the AWB (Auto White Balance)
mode. To override it, you will need to get
into the camera's menu and set it to one
of several standard presets like "sunny",
"cloudy", "fluorescent",
"flash" and "incandescent".
Each setting is usually depicted with a
graphical icon such as a light bulb for
the incandescent setting or a lightning
sign for the flash setting. On some models,
there is an additional option whereby the
user can point the camera at a reference
white object to manually calibrate the white
balance under specific lighting conditions.
The user-calibrated setting can then be
saved as a custom preset.
Dig
up the instruction manual to verify the
type of white balance options and settings
available for your particular model, if
you are unsure or unfamiliar. While you
are at it, learn to identify the exact position
of little white balance sensor window that
is found on the front of certain models.
A wrongly placed finger may block the sensor,
resulting in misadjusted colours. Incidentally,
the tips, techniques and info on white balance
discussed here apply to most video cameras
as well.
You
will soon learn that it is not as simple
as matching a preset icon to the existing
ambient light. You set the camera to auto
or dialed up the incandescent setting so
as to properly photograph someone blowing
out the candles on a birthday cake. The
candle flames in the picture ended up all
white instead of yellow and the atmosphere
is somewhat ruined. In this particular case,
choosing a 'mismatched' setting such as
the outdoor setting (intentionally) produces
a more realistic and warmer picture. Fortunately,
with the LCD preview screen you can play
around with various white balance settings
until you find a satisfactorily combination.
|
|
|
 |
| Break
the rules. By using a daylight setting
in the night, the light from the candles
appears warmer and more life-like. ISO
50, f2.5, 1/8 sec |
|
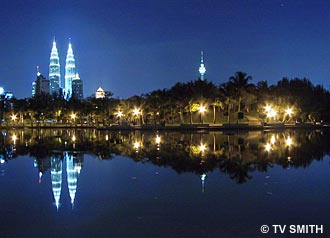
Custom
white balance transformed this nightime
view of a lake and surroundings into
something magical and enchanting. ISO
50, f3.5, 6 sec |
Under
normal lighting conditions, auto white balance
usually works quite well. Which is good,
as it is impractical to keep changing settings
manually each time you move from one place
to another. In certain situations, the auto
white balance circuitry might be overwhelmed
and is unable to remove or reduce the resulting
strong colour casts. Have you ever tried
photographing people under one of those
bluish or reddish translucent tents put
up at daytime outdoor functions? Switch
to manual white balance (if available) and
adjust it to a white shirt or handkerchief
under the same light source. The manual
setting should improve the colour balance
greatly and remove the tint from faces.
Do not forget to set the camera back to
AWB when you are done shooting under the
tent.
What
about mix lighting from two or more sources?
When both floodlights and twilight illuminates
a building (for example), which light source
should you set your white balance to? The
tungsten preset deepens the blue sky while
a daylight setting warms up the building
and the foreground. Each option produces
a distinctly different effect. By mastering
the technique of white balance, you can
use it to emphasize mood, convey ambience
and create a more interesting picture.
Above
article appeared in the print and online
version of The
Star Weekend 13/03/04.
INTRO
| START
| PREVIOUS
| NEXT
|
THUMBNAILS
| INDEX
| ARTICLES
| PHOTO ESSAYS
|
|
