INTRO
| START
| PREVIOUS
| NEXT |
THUMBNAILS
| INDEX
| ARTICLES
| PHOTO ESSAYS
|
In
A Flash
By
TV Smith
19th
June 2004
This
week, TV SMITH provides some quick tips and
useful suggestions for flash photography...
The built-in flash of many cameras offer unbeatable
convenience even if it comes with limitations.
The most obvious advantage is that the flash
goes everywhere with you. However, due to
the nature of its design, its range is limited
and the flash unit can’t be physically
rotated for bounce or indirect lighting. Nevertheless,
with proper use and some understanding of
the restrictions, you may still obtain acceptable
results.
As with most small point-and-shoot cameras,
the flash is usually positioned where users
might accidentally conceal it with their fingers
during picture taking. Even partial concealment
of the flash can result in underexposure or
unsightly shadows. In addition, some cameras
have another sensor in front, which controls
the firing duration of the flash. If this
sensor is also blocked by a finger, overexposure
may result.
Attaching certain accessories to the front
of the camera can also block some of the light.
Some cameras come with a raised pop-up mechanism
to alleviate these problems.
|
|
|
Directional
evening sun causes an underexposed image
as camera's metering system is influenced
by the strong back light.
Olympus C8080, ISO 400, f4, 1/500 sec |
Enter
fill-flash. The camera measures the
ambient lighting and outputs enough
flash to fill the shadows for a natural-looking
picture.
Olympus C8080, ISO 100, f3.2, 1/320
sec |
|
|
|
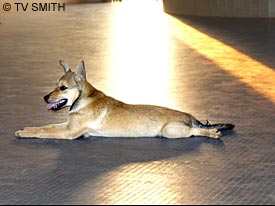
In
this case, flash may not always be desired
as it kills the ambience. Compare this
with the picture taken without flash
(right).
Olympus C8080, ISO 200, f3.2, 1/30 sec
|
On
some cameras, the flash may be set at
default to fire when there is inadequate
light. Locate the button to disable
the flash.
Olympus C8080 ISO 200, f3.5, 1/30 sec |
|
|
One of the most common and perplexing flash-related
problems is the “red eye” phenomenon.
It is caused by light reflected off a retina
during flash photography. With compact cameras,
the problem becomes more apparent due to the
proximity of the built-in flash to the lens.
There are several ways to overcome or reduce
“red eye”.
Most
cameras are now fitted with a “red-eye”
reduction feature, which works by firing
a “pre-flash” before the actual
exposure. The first flash will cause your
subject’s pupil to contract, thereby
reducing the “red-eye” effect
during the second flash.
If
you are using a digital camera with instant
review, examine the effects of moving nearer
or further from your subjects. Sometimes,
a different angle or position can help lessen
the effect. One of the simplest solutions
is to turn up or switch on more lights in
the room or mount an external flash, which
allows you to bounce the light off the ceiling.
Several computer programmes are also available
for fixing or removing “red-eye”
effect.
The
other frequent problem encountered is inconsistent
or underexposed flash pictures. This is
due mainly to the lack of understanding
or familiarity with the way the flash re-charges
itself.
The charging duration after each shot –
known as “recycling time” –
is governed by several factors such as the
ambient light, battery condition and even
menu settings. This can take a couple of
seconds or longer, especially if the battery
is running low.
On
some models, and depending on the settings,
the flash will not fire unless it is adequately
charged for the given exposure. It may be
possible to override it with some models,
thereby allowing shooting even when the
flash is not fully ready. While this might
result in an underexposed picture, it could
be better than no picture at all.
The
“flash ready” indicator light is
usually shown in the viewfinder and it helps
to be conscious of it. One of the most convenient
but under-utilised features of the built-in
flash is the fill-flash function. You can
use it in the daytime, in bright open places
when the subject is backlit or under a shadow.
It
used to be a highly complicated process,
calculating the correct ratio and settings
for this type of outdoor photography. Most
current digital cameras have a special mode
for this purpose and all you need to do
is to click and review the image on the
LCD. Just make sure your finger doesn’t
get in the way.
Above
article appeared in the print and online
version of The
Star Weekend 19/06/04.
INTRO
| START
| PREVIOUS
| NEXT |
THUMBNAILS
| INDEX
| ARTICLES
| PHOTO ESSAYS
|
|